
Technical Specs: Understanding Large Format Lenticular Sheets for 2026 Installations

What if the success of your next landmark architectural installation depended entirely on a single degree of optical refraction? You already know that large-scale graphics must do more than occupy a wall; they should breathe, shift, and engage the audience as they move through a space. However, the technical gap between a vivid 3D experience and a disorienting, ghosted image often feels like a barrier of dense jargon. It’s frustrating when the creative vision is clear but the underlying lenticular printing specifications remain a source of uncertainty.
This guide empowers you to master the delicate science of large-format optics, ensuring your 2026 projects deliver flawless motion and depth. We’ll strip away the confusion surrounding LPI and viewing distances while addressing the practicalities of material durability in high-traffic public environments. You will gain a clear understanding of lens geometry and a rhythmic roadmap for technical prototyping. From the transition toward sustainable PETG materials to selecting the perfect sheet thickness for spatial transformation, we provide the clarity you need to build with absolute confidence.
Key Takeaways
- Learn how to align lens frequency with spatial depth to ensure your installation remains sharp and impactful from any intended viewing distance.
- Master the nuances of lenticular printing specifications to eliminate visual ghosting and maintain image integrity across massive architectural surfaces.
- Identify the optimal viewing angles for your project, choosing between narrow arcs for deep 3D effects or wider spans for fluid motion transitions.
- Understand the critical role of lens orientation in guiding the viewer’s gaze and transforming a static environment into a kinetic journey.
- Discover why custom prototyping is the most reliable method for verifying technical specs and material resilience in high-traffic public spaces.
The Anatomy of Large Format Lenticular Sheets
A large format lenticular sheet is far more than a simple substrate; it’s a precision-engineered optical instrument designed to manipulate light. These thermoplastic sheets act as a bridge between a static image and a kinetic experience. Adhering to rigorous lenticular printing specifications ensures that every refraction serves the artist’s vision, transforming a flat surface into a multi-dimensional journey. At its core, the material functions by isolating specific slices of information and presenting them to the viewer based on their physical position in the room.
The magic happens within the “lenticule,” an individual semi-cylindrical lens that runs the length of the sheet. These lenses are arranged in a parallel grid, acting as magnifying windows that reveal different “frames” of an interlaced image as the viewing angle changes. While standard offset sheets are thin and flexible for small-scale marketing, architectural installations require “extruded” lenses. These are thicker, more stable, and designed to maintain optical clarity across massive surface areas without the warping common in lighter materials.
Material Composition: PETG vs. Acrylic
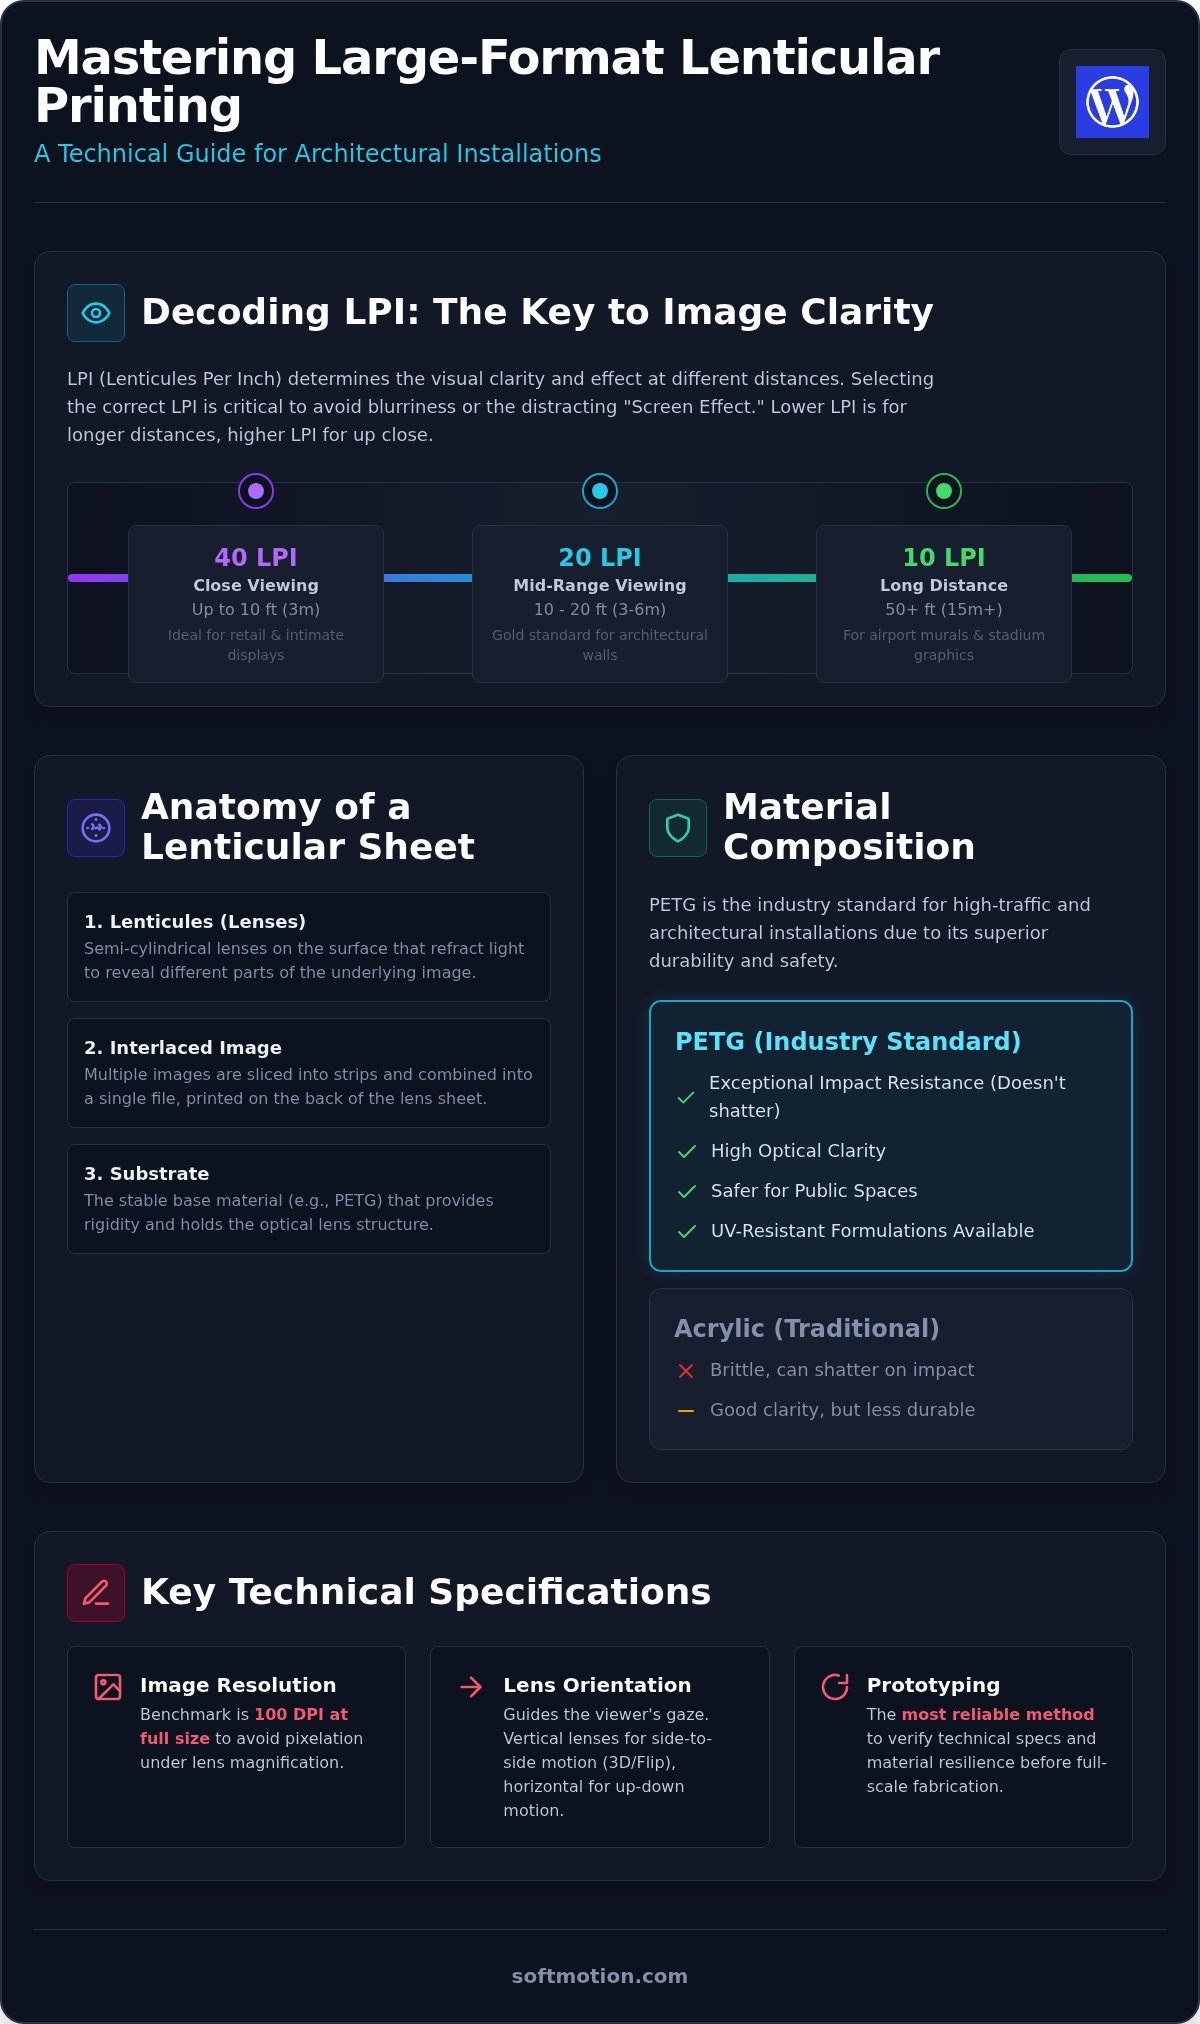
Selecting the right polymer is a balance of aesthetics and endurance. PETG has become the industry standard for high-traffic interiors because it offers exceptional impact resistance and clarity. It doesn’t shatter like traditional acrylic, making it a safer choice for public concourses or retail environments. For 2026 outdoor installations, UV-stability is the primary technical hurdle. Specialized UV-resistant PETG formulations are now required to prevent the yellowing or “pinking” that occurs when standard plastics are exposed to prolonged sunlight. The thickness, or caliper, of the sheet also plays a structural role. Thicker sheets provide the necessary rigidity to remain perfectly flat when mounted, which is essential because even a slight curve can distort the intended optical effect.
The Interlacing Foundation
Before the first drop of ink touches the lens, the digital artwork must undergo a complex transformation. Multiple frames of motion or depth are sliced into microscopic strips and merged into a single file. This file must match the lens pitch with mathematical precision. High-resolution preparation is vital; for large-scale pieces, a resolution of 100dpi at full size is the benchmark to avoid pixelation under magnification. Interlacing is the mathematical alignment of imagery to the optical grid. Without this perfect synchronization, the final large format lenticular printing would suffer from ghosting or a complete loss of the 3D effect. It’s the technical discipline that allows the visionary concept to survive the transition from the screen to the physical wall.
Decoding LPI: The Key to Image Clarity
LPI, or Lenticules Per Inch, is the pulse of any lenticular installation. It dictates how the human eye perceives depth and motion from a specific vantage point. In the context of lenticular printing specifications, selecting the correct LPI is a balance between optical resolution and physical scale. While small-scale commercial printers often push for higher LPI to achieve fine detail, large-scale architectural projects require a different logic. Each lens must be sized correctly to ensure the image remains sharp at the intended distance.
The inverse relationship is your primary guide. A lower LPI means fewer, wider lenses per inch. These wider lenses are essential for long viewing distances, as they allow the refracted light to travel further before the image blurs or “breaks.” Conversely, a higher LPI is suited for intimate encounters. If you select an LPI that’s too low for a close-range display, viewers will experience the “Screen Effect.” This is where the physical vertical lines of the lenses become a distraction rather than a vehicle for the art. For most large-scale walls, the technical sweet spot lies between 10 LPI and 40 LPI.
LPI Selection Based on Viewing Distance
Your choice should mirror the expected movement of the audience. A 20 LPI lens is often the gold standard for viewers positioned 10 to 20 feet away. It provides a robust 3D effect without sacrificing clarity. In retail window displays where foot traffic is within arm’s reach, a 40 LPI lens offers the high-definition detail necessary for luxury branding. For “mega-format” installations, such as airport murals or stadium graphics viewed from across a terminal, a 10 LPI lens is required to ensure the motion remains fluid and visible from 50 feet or more.
Thickness and Rigidity Specs
The caliper, or thickness, of the sheet is inextricably linked to the LPI and the intended visual outcome. Thicker sheets generally allow for a more aggressive lens curvature, which provides the physical “room” needed for deep 3D parallax. This depth is what creates the illusion of objects floating in front of or behind the wall. Beyond the visual impact, thickness is a matter of architectural integrity. Thin sheets are prone to “oil canning” or warping when mounted to uneven surfaces. Specifying a thicker, rigid PETG substrate ensures the installation remains perfectly planar, preserving the precision of the optical grid over years of public exposure. Before committing to a full production run, requesting a lenticular sample is the most effective way to verify how these technical choices interact with your site’s unique lighting and sightlines.
Optical Physics: Viewing Angles and Interaction Zones
Perspective is the silent architect of every lenticular experience. The viewing angle defines the total arc in which the optical effect remains active, serving as the boundary between a living image and a static surface. Within this arc, we identify the “Interaction Zone,” the physical corridor where the digital preparation meets human perception. For designers, this zone is the most critical element of lenticular printing specifications; it determines whether a mural feels like a breathing entity or a disorienting distraction. In a high-traffic environment, the viewer’s walking speed and their lateral distance from the wall dictate whether they witness a smooth narrative transition or a jarring, fragmented jump.
Static signage asks for a glance, but lenticular installations demand a journey. The Interaction Zone isn’t just a measurement; it’s the theater where the viewer’s movement creates the art. If a viewer is standing still, like in a waiting area, they need a different optical setup than someone traversing a 50-foot corridor at a brisk pace. Understanding these spatial dynamics allows you to transform a passive environment into a responsive, kinetic dialogue. It’s the difference between a graphic that simply exists and one that truly engages.
The 3D Depth Spec: Narrow Angle Lenses
Narrow angles, typically ranging from 15 to 25 degrees, concentrate light with surgical precision to create the illusion of volume. This tight focus is essential for maximizing parallax, the phenomenon where objects appear to shift relative to one another based on the viewer’s position. Gallery-grade fine art lenticular prints often rely on these narrow arcs to immerse the audience in a deep, sculptural space that defies the flat substrate. However, there’s a technical risk. If the viewing angle is too narrow for a wide transit space, the image may “ghost,” showing overlapping frames that blur the intended depth. Precision in your lenticular printing specifications is non-negotiable here; the lens must be perfectly matched to the viewer’s distance to maintain that crisp, three-dimensional clarity.
The Motion Flip Spec: Wide Angle Lenses
When the creative goal is movement rather than depth, wide-angle lenses (40 to 50+ degrees) are the superior tool. These lenses invite the viewer to participate in a narrative, allowing multiple distinct images to “flip” or transition as they walk past the installation. Understanding the fundamental distinction between lenticular 3D vs flip effect is essential for specifying the right lens type and frame count for your project’s storytelling goals. In transit hubs like airports or subway stations, where commuters move quickly, a wide angle ensures the animation plays out fully before the viewer exits the interaction zone. Balancing the number of frames is a delicate art. A 2-phase flip offers a punchy, high-contrast change, while multi-phase animations provide a fluid, cinematic sweep. Choosing the right wide-angle lens prevents the “flutter” effect, ensuring every frame lands with clarity and intent as the viewer moves through the space.
Orientation and Panelization for Large Installations
Design is a response to movement. When planning a massive installation, the orientation of the lens grain is the most consequential decision in your lenticular printing specifications. It dictates how the audience interacts with the work. Vertical lenticules are the industry standard for lateral movement, where the viewer walks past the wall. This setup ensures that as the person moves from left to right, their eyes cross the semi-cylindrical lenses, triggering the intended animation or 3D shift. Without this alignment, the kinetic energy of the piece remains dormant.
The seam is where technical discipline meets artistic illusion. In large scale projects, you are rarely working with a single sheet; instead, you are orchestrating a series of panels to form a cohesive whole. Achieving optical continuity across these joins requires microscopic precision. If the lens pitch on panel A is offset by even a fraction of a millimeter from panel B, the visual effect will break at the seam, shattering the immersion for the viewer. This is why large format lenticular printing demands a rigorous panelization strategy from the outset.
Vertical Orientation for Lateral Movement
Vertical lenticules are essential for kinetic murals in corridors, lobbies, and street-level advertising. To ensure a smooth experience, you must calculate the “flip rate” based on the average walking speed of the audience. In a high-traffic transit hub, a viewer might traverse the interaction zone in mere seconds. If the lenses are too narrow or the frames too numerous, the animation will appear as a frantic blur. Technical specs for these installations must prioritize the alignment of the vertical grain. We utilize laser-leveling during the fabrication process to ensure that every panel is perfectly plumb, maintaining a seamless transition as the viewer’s gaze travels across the wall.
Horizontal Orientation for Vertical Movement
Horizontal lenses are a specialized choice, reserved for environments defined by vertical travel. Elevators, escalators, and stairwells provide the perfect stage for an “up-down” flip effect. As the viewer rises or descends, the changing angle of their eyes relative to the horizontal lenses reveals the hidden frames. While horizontal orientation is rarer in the broader market, it offers a high-impact surprise in specific architectural niches. It transforms a mundane transition between floors into a moment of sensory delight, proving that even a functional space can hold a visionary experience.
Structural integrity is just as vital as optical clarity. For large format installations, we recommend mechanical fastening over simple adhesive mounting. Thermoplastic sheets expand and contract with temperature fluctuations; a rigid adhesive can cause the material to buckle or “oil-can,” which distorts the lens geometry. Mechanical systems allow the material to breathe while keeping it perfectly flat against the substrate. To see how these technical choices perform in person, we invite you to request a custom lenticular sample for your next project.
From Specs to Reality: Prototyping and Fabrication
The transition from a technical drawing to a physical installation is the moment where precision meets poetry. While the lenticular printing specifications established in the early phases provide the essential framework, they are not a substitute for the physical experience. In 2026, high-end architectural and advertising projects demand a level of custom fabrication that transcends simple file output. Every environment possesses its own unique light quality, foot traffic patterns, and reflective surfaces. Treating your technical spec sheet as a living document allows for the necessary refinements as the site conditions are fully understood. It is a collaborative journey that moves from the imaginative concept toward a concrete, logical conclusion. For a deeper look at how modern fabrication methods have evolved to meet these demands, explore the evolution of large-scale lenticular printing technology and what it means for your 2026 projects.
The Importance of Physical Sampling
Digital mockups are useful for composition, but they fail to capture the sensory weight of a shifting image. A pixel on a screen cannot replicate the way a lenticular lens interacts with ambient sunlight or overhead LEDs. This is why a physical lenticular sample is the most critical component of the design phase. It allows you to test different LPIs and material thicknesses in the actual lighting of the installation site. We strongly advise architects to request 1:1 scale samples of critical image areas. This ensures that the transition speed and depth are exactly as intended before the full-scale production begins. A full-scale prototype is often the only way to truly verify viewing distances and ensure the interaction zone is optimized for the space.
Softmotion’s Collaborative Engineering
Softmotion acts as a bridge between the imaginative spark of an artist and the rigid laws of optical physics. We don’t just print; we engineer experiences. The value of lenticular installation project management lies in ensuring that every technical detail remains compliant with the project’s vision. This process involves a methodical, purposeful flow that guides you through the complexities of lens geometry and structural panelization. We provide the technical discipline required for a risk-free execution, ensuring that the final result resonates with the intended audience. We invite you to consult with a Visionary Guide at Softmotion to transform your complex lenticular printing specifications into a seamless, multi-dimensional reality for your next large-scale project.
Realizing the Kinetic Vision in 2026
Mastering the technical landscape of large-scale optics is the first step toward creating a truly transformative environment. You’ve explored how the delicate balance of LPI, viewing angles, and material resilience forms the foundation of a successful installation. These lenticular printing specifications aren’t just numbers on a page; they’re the invisible threads that weave together light and motion to captivate your audience. By aligning lens geometry with the specific rhythms of your site, you turn a static wall into a living narrative.
The path from a complex vision to a flawless physical reality requires a partner who understands both the art and the engineering. With over 1,000 successful installations delivered worldwide, Softmotion brings deep expertise in architectural kinetic art and global project management to every collaboration. We’re here to guide you through every technical hurdle with a composed, professional approach. Partner with Softmotion for your next large-scale lenticular masterpiece and let’s redefine what’s possible in your space. The future of spatial design is kinetic, and it’s waiting for your unique perspective.
Frequently Asked Questions
What is the difference between LPI and DPI in lenticular printing?
LPI refers to the physical frequency of the lenses on the thermoplastic sheet, while DPI describes the resolution of the printed image behind those lenses. LPI is a hardware specification of the plastic substrate itself. DPI is a digital output value. For optimal clarity, the image DPI should be a direct mathematical multiple of the lens LPI to ensure every pixel aligns perfectly with the optical grid.
Can large format lenticular sheets be used outdoors in 2026?
Yes, large format lenticular sheets are fully viable for outdoor environments in 2026, provided they utilize UV-stabilized PETG or specialized acrylic formulations. These materials are engineered to comply with current REACH and RoHS standards. You must specify a UV-inhibitor coating to prevent the polymer from yellowing or becoming brittle under prolonged solar exposure, ensuring the installation maintains its structural and optical integrity over time.
How do I determine the best viewing distance for my lenticular wall?
The optimal viewing distance is dictated by the LPI (Lenticules Per Inch) of the sheet you select for the project. For a standard 20 LPI lens, the most effective interaction zone typically sits between 10 and 20 feet away. If your audience is positioned further away, such as in a transit terminal or stadium concourse, you should specify a lower LPI to maintain the visual effect at scale.
What causes “ghosting” in a lenticular print and how do I fix it?
Ghosting occurs when the viewing angle is too narrow for the environment or when the interlaced file doesn’t perfectly match the physical lens pitch. It manifests as a blurry overlap where two frames are visible at once. To fix this, refine your lenticular printing specifications to include a “pitch test” on the exact production material. This calibration ensures digital slices align with the physical lenses.
Are there size limits for a single lenticular sheet?
Single extruded lenticular sheets are typically manufactured in dimensions up to 48 by 96 inches. While these are the standard maximum sizes for a single piece, much larger installations are achieved through precise panelization. By aligning the vertical lens grain across multiple sheets, we create kinetic murals that span hundreds of feet. The true limit is the precision of the installation’s structural framework, not the material.
How do I clean and maintain a large-scale lenticular installation?
Maintain your installation by using a soft, non-abrasive microfiber cloth and a mild, ammonia-free soap solution. Avoid harsh chemicals or solvent-based cleaners that can cloud the thermoplastic surface or degrade the optical ridges. Because the lenses are semi-cylindrical, always wipe in the direction of the lens grain to prevent dust buildup within the grooves. Regular dusting preserves the clarity and brilliance of the imagery.
What is the best way to mount large format lenticular panels?
Mechanical fastening systems are the superior choice for mounting large format lenticular panels in public spaces. Unlike permanent adhesives, mechanical tracks allow the thermoplastic material to expand and contract naturally with temperature fluctuations. This prevents the warping that distorts lens geometry. Using a floating frame ensures the panels remain perfectly planar, which is vital for maintaining consistent lenticular printing specifications across the entire surface.