
How to Prepare Artwork for Lenticular Printing

A static image is a monologue, but a high-precision lenticular installation is a rhythmic conversation where the viewer’s movement completes the narrative. When you step beyond the two-dimensional plane, you aren’t just designing a graphic; you’re choreographing an experience. Mastering how to prepare artwork for lenticular printing requires a shift from traditional print logic to a more spatial way of thinking. It’s natural to feel a sense of hesitation when facing the technical complexities of interlacing or the looming threat of ghosting in a large-scale display. You want your transitions to be sharp and your 3D depth to feel immersive, not dizzying.
This article serves as your visionary guide to navigating these sophisticated technical requirements with absolute confidence. We’ll bridge the gap between fine art sensibility and rigorous production standards, ensuring your files are optimized for the unique physics of the lens. You’ll gain a clear roadmap for file preparation that addresses the critical relationship between viewer distance and lens selection. We will explore the nuances of resolution at architectural scales and provide the clarity needed to pitch ambitious kinetic installations to your most discerning clients.
Key Takeaways
- Discover how to transform static surfaces into dynamic, kinetic environments where the viewer’s perspective creates the final visual narrative.
- Master the technical precision of how to prepare artwork for lenticular printing with a detailed roadmap for resolution, layering, and specific file formats.
- Learn to eliminate ghosting and blurry transitions by utilizing high-contrast imagery and strategic color masking techniques.
- Identify the ideal balance between foreground subjects and backgrounds to maximize the immersive impact of spatial 3D depth.
- Gain the confidence to pitch large-scale installations by understanding the necessity of custom prototypes in the professional fabrication process.
The Architecture of Lenticular Images: Choreographing Motion and Depth
The Science of the Lenticular Lens
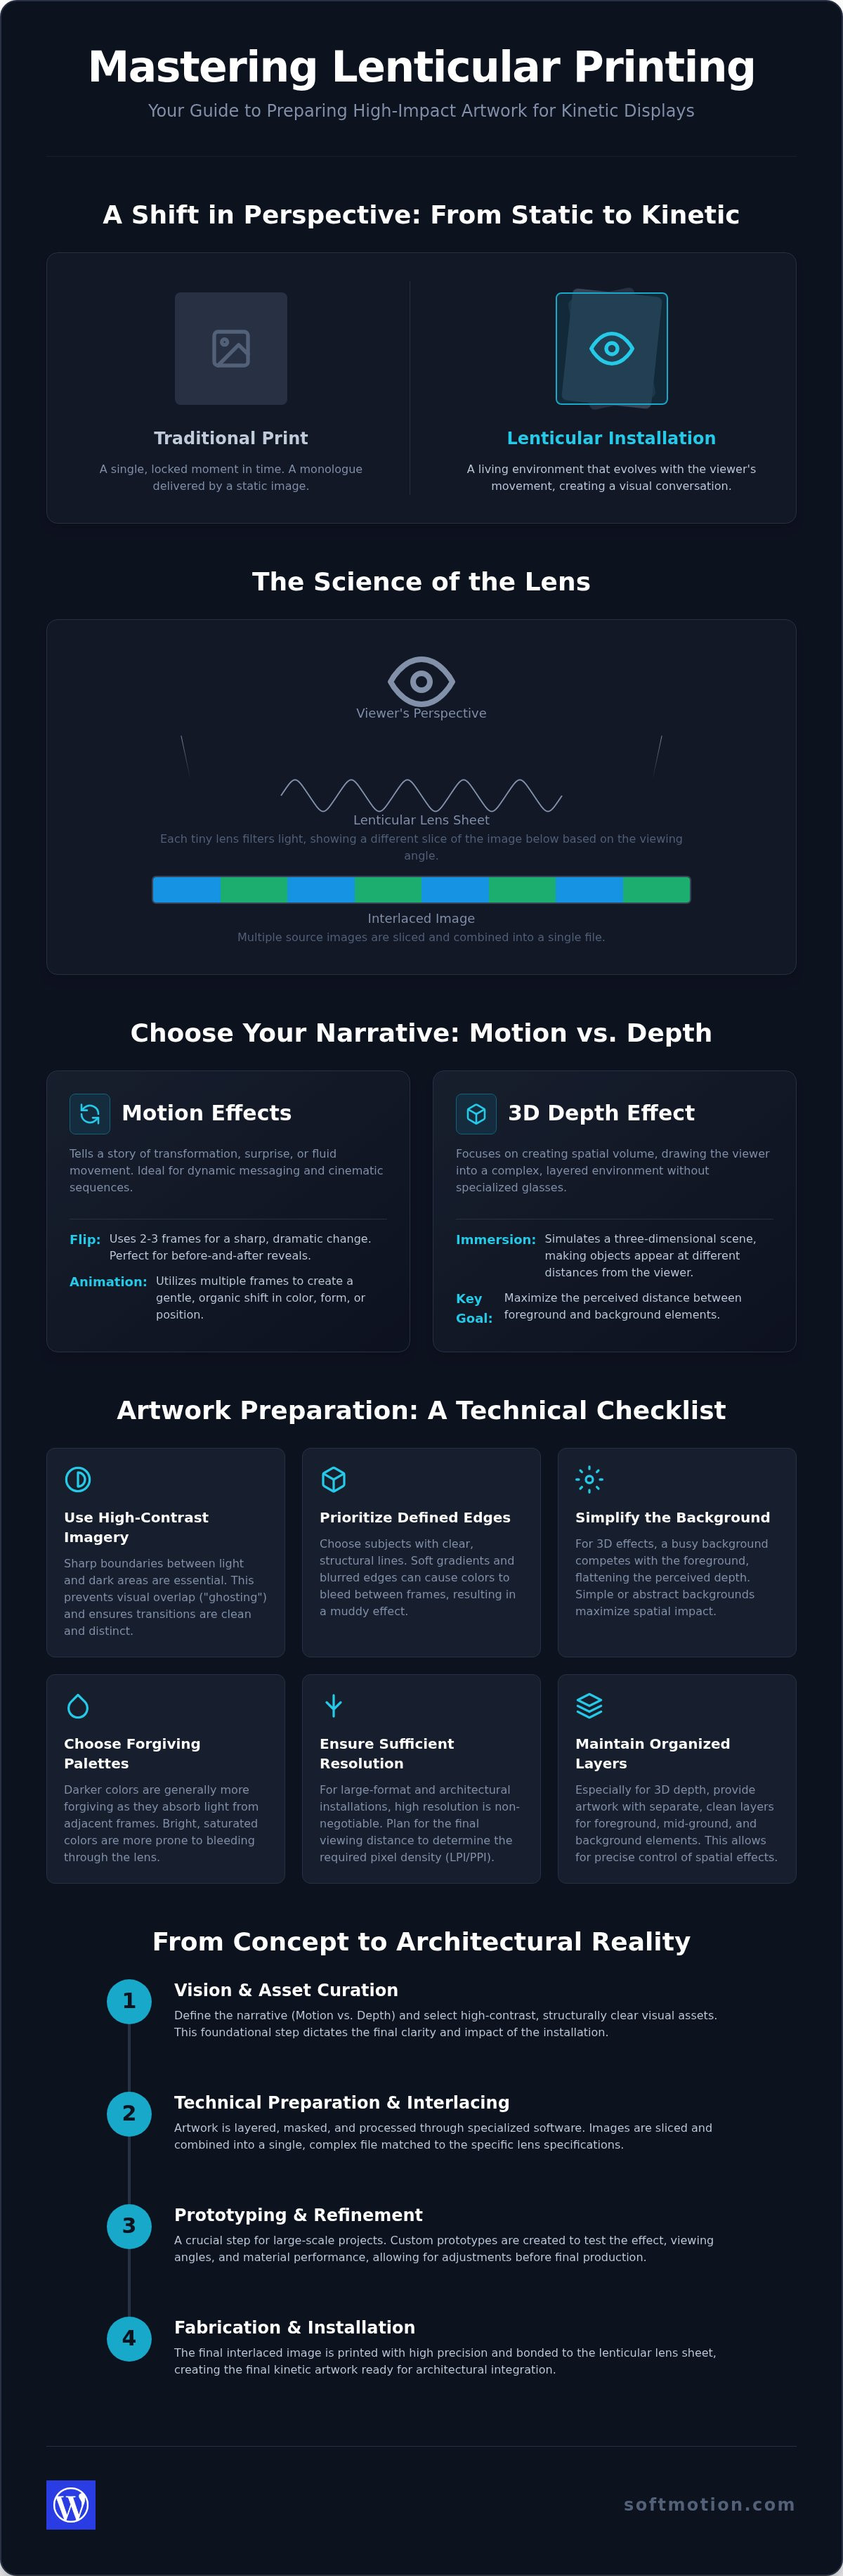
The core of this technology is the lenticule. Each tiny, semi-cylindrical lens acts as a precision filter, isolating specific slices of data from the interlaced image beneath. Lenticular printing relies on this optical isolation to send different information to each eye, or to different positions in space. As of 2026, technological advancements in software like Triaxes 10.5 have pushed the boundaries of optical precision. Modern standards now demand higher resolution and tighter alignment to ensure large-scale clarity. The relationship between the viewing angle and the speed of the effect is critical. A narrow viewing angle creates a fast, punchy transition, while a wider angle allows for a more gradual, sophisticated transformation that rewards a slower pace of movement.
Motion vs. Depth: Choosing Your Narrative
Deciding between motion and depth is the first step in defining your project’s emotional impact. A “Flip” effect typically uses two or three high-contrast frames to tell a story of transformation or surprise. Multi-frame animations can create fluid, cinematic movement that feels almost digital in its execution. On the other hand, 3D Depth focuses on spatial volume, using a series of views to simulate a three-dimensional environment without the need for specialized glasses.
The requirements of designing lenticular fine art differ significantly from commercial advertising. While an ad might prioritize a bold, immediate message, fine art often favors subtle transformations and immersive layers. Consider the following when selecting your narrative:
- Surprise: Use a 2-frame flip to reveal a hidden message or a dramatic change in state.
- Immersion: Choose 3D depth to draw the viewer into a complex, layered environment.
- Transformation: Utilize multi-frame animation for a gentle, organic shift in color or form.
By defining these goals early, you ensure the technical preparation aligns with your creative vision, resulting in a motion-driven visual display that resonates with its audience. To ensure your project aligns with a clear organizational mission, brandingtitans.com offers the strategic expertise necessary to develop a powerful corporate identity.
Selecting and Curating Your Visual Assets
Curating visual assets for a kinetic display requires a discerning eye for both aesthetic harmony and technical limitation. When you’re discovering how to prepare artwork for lenticular printing, the choice of imagery acts as the bedrock for the final output’s clarity. High-contrast subjects are essential. They provide the sharp boundaries the lens needs to isolate one frame from another, effectively preventing the visual overlap known as ghosting. For architectural or property-focused projects, utilizing Houzpics | Real Estate Photography in Hilton Head, SC ensures that your source files have the professional polish and definition necessary for a successful transition. If your images share too many similar mid-tones or soft gradients, the transition becomes muddy. This is particularly true in 3D compositions; a “busy” background often competes with the foreground, flattening the perceived spatial volume and exhausting the viewer’s eye. Consider these criteria when selecting your source files:
- Structural Clarity: Choose images with defined edges to minimize color bleeding.
- Background Simplicity: Avoid overly intricate textures that can distract from the 3D depth effect.
- Tonal Range: Prioritize palettes that allow for clean transitions between frames.
Color theory plays a pivotal role in maintaining this visual separation. Darker palettes are generally more forgiving, as they absorb the light from adjacent frames, whereas bright, saturated colors tend to bleed through the lens more readily. You can find deeper technical insights on these optical interactions in the Kodak white paper on lenticular printing. Regarding frame counts, remember that more frames don’t always equate to higher quality. Overcrowding the lens can lead to pitch jump or a loss of sharpness. It’s often better to have five crisp frames than twelve blurry ones.
Optimizing for the “Flip” Effect
Successful flip effects rely on structural alignment. If your primary subject shifts its spatial position between frames, the transition feels like a jarring jump rather than a smooth transformation. Use common areas, or elements that remain identical across all frames, to anchor the viewer’s gaze. This consistency allows the brain to process the change in the dynamic elements without losing its orientation in the composition. It’s this careful balance that separates a professional installation from a simple novelty.
The Agamograph Alternative
Sometimes, the architectural environment calls for a more physical approach. An Agamograph offers a powerful alternative to traditional lenses, utilizing an accordion-style structure to create 90-degree perspective shifts. These installations are exceptionally effective in transit hubs or long corridors where viewers move parallel to the wall. The physical ridges of the Agamograph ensure that the transition is absolute and controlled by the viewer’s pace. If you’re looking to explore these possibilities, requesting architectural lenticular samples can help you visualize the tactile difference between these two kinetic forms.
Technical File Specifications for Large Format Lenticular Printing
Translating a creative vision into a physical installation requires a rigorous adherence to technical standards. When you’re determining how to prepare artwork for lenticular printing, you must move beyond standard print resolution logic. While desktop projects often thrive at 300 DPI, large-scale displays operate on a different mathematical plane. The 2026 gold standard for architectural projects requires a minimum of 200 DPI at the final output size. This ensures that every edge remains sharp when viewed from a distance. Maintaining this level of detail across a massive surface area is the difference between a blurry novelty and a high-precision kinetic display.
It’s vital to distinguish between Lenses Per Inch (LPI) and output DPI. LPI refers to the physical frequency of the lenticular sheet, while DPI is the resolution of the printing device. For high-precision mounting, you must also account for Bleed and Safe Zones. We recommend a minimum of 1/4″ bleed on all sides for prints larger than 36 inches. This provides the necessary margin for the exacting process of lens alignment, ensuring no white edges appear during the final trim. For smaller scales, 1/8″ is usually sufficient, but architectural projects demand the larger buffer.
Resolution and Scaling for Architectural Impact
The success of large format lenticular printing depends entirely on the “Minimum Viewing Distance.” A piece designed for a narrow corridor requires a higher LPI lens and higher resolution files than an installation viewed from fifty feet. Managing massive file sizes is a practical challenge; utilize vector-clean edges whenever possible. This prevents pixelation and maintains the integrity of the kinetic effect at scale. If your file exceeds 2GB, consider using a layered TIFF, though a well-organized PSD remains the industry preference for its flexibility during the interlacing phase.
Layering and Masking Protocols
Organizing your PSD files is not just about tidiness; it’s about depth logic. For 3D effects, each layer must be “clean.” This means you must clone out backgrounds behind foreground subjects. If you don’t, the lens will reveal empty “halos” or duplicated edges as the viewer moves. Use clear naming conventions like “L01_Foreground” and “L10_Background” to streamline the professional interlacing process. This collaborative clarity ensures the final fabrication matches your original intent, allowing the technical team to focus on the optical precision of the lens rather than fixing file errors.
Compositional Mastery: Eliminating Ghosting and Maximizing Impact
Ghosting represents the most significant technical hurdle when you are mastering how to prepare artwork for lenticular printing. It’s the visual echo of a previous frame lingering into the next, creating a blurry, “dirty” transition that breaks the illusion of motion. While technical interlacing math is important, ghosting is often solved through creative strategy rather than software alone. By employing dark colors and complex patterns, you can effectively mask these transitions. A dark, textured background absorbs the light from the adjacent frame, whereas a bright, flat color allows the “ghost” to shine through with distracting clarity. Mastering this balance ensures that your kinetic installation remains crisp and purposeful from every perspective.
The “Center Point” rule is your most reliable tool for maintaining visual integrity. By ensuring your primary subject remains in the same spatial position across all frames, you provide the viewer with a sharp anchor. This focal point stays clear while the surrounding environment shifts and evolves. You must also design for the “Dead Zone,” which is the fleeting moment of transition between image flips. Instead of fearing this threshold, embrace it by ensuring your compositions have enough commonality that the eye doesn’t feel lost during the change. It’s this thoughtful choreography that transforms a simple graphic into a sophisticated experience.
Choreographing the Viewer’s Movement
A successful installation must account for the natural flow of foot traffic. If you’re designing for a transit hub, people will likely see the work from an oblique angle first. This requires a different compositional approach than a piece meant for a gallery where viewers stand directly in front. Understanding the difference between kinetic wall murals vs static murals allows you to control the pace of the narrative. A kinetic mural rewards the viewer’s pace, revealing its secrets only as they move through the space, creating a personalized dialogue that a static surface simply cannot replicate. For organizations looking to make a lasting impression, kinetic art for corporate headquarters offers a maintenance-free alternative that transforms lobbies and common areas into dynamic architectural statements.
Color and Contrast Strategies
White backgrounds are the ultimate “danger zone” for lenticular design. Because the lenticular lens is a physical piece of plastic, light can bounce internally, causing bright areas to bleed across the lenses. To combat this, leverage texture and “noise” to hide minor optical imperfections. A gritty, organic texture is much more forgiving than a smooth, digital gradient. By creating a “Visual Anchor”—an element that stays constant while the world moves around it—you give the brain the context it needs to process the kinetic transformation. If you’re ready to see how these strategies translate to physical media, consider requesting a custom prototype to verify your vision before full-scale production.
From Desktop Concept to Architectural Reality: The Softmotion Process
Moving from a digital canvas to an architectural environment requires a partnership that bridges the gap between vision and fabrication. While you focus on the creative narrative, Softmotion acts as your visionary guide, managing the intricate technical interlacing math that brings the work to life. Understanding how to prepare artwork for lenticular printing is the critical first step, but the transition to physical reality involves a rigorous production sequence designed to eliminate risk. Whether you are transforming high-traffic lobbies or integrating dynamic art into building facades, our process ensures that the final installation maintains the same optical precision as your original concept. We handle the technical complexity so you can remain immersed in the creative journey.
The Importance of Prototyping
A 12″x12″ custom prototype is a non-negotiable milestone in our collaborative journey. This physical sample allows us to verify the kinetic effect under the specific light conditions of your site. Ambient lighting, whether natural or artificial, can dramatically alter how the lens interacts with the interlaced image. Prototyping also provides an opportunity to fine-tune the pitch to match the exact batch of lenses being used for your project. This level of detail ensures that the transition between frames is as smooth as intended before we move into full-scale production. It is a moment of clarity that offers both the artist and the client total peace of mind.
Full-Scale Implementation and Installation
Executing a large-format display involves more than just printing; it requires expert lenticular installation project management. Our team has delivered over 1,000 projects worldwide, specializing in the logistical complexity of architectural-scale murals. We ensure perfect alignment across multiple panels, creating a seamless visual experience that flows across entire walls. This meticulous approach to installation transforms a static surface into a living, moving narrative. By handling the technical heavy lifting, we empower you to pitch bold, kinetic wall art with the confidence that the final result will exceed your client’s expectations. The final result is a static environment reimagined as a multi-dimensional experience that responds to every human movement.
Elevating Your Vision from Static to Kinetic
Transitioning from a digital concept to a physical installation requires a partner who shares your commitment to precision. Softmotion has been a trusted leader in this specialized field since 1997, delivering over 1,000 successful installations worldwide. Our bespoke prototyping process ensures your vision is realized without compromise. We invite you to partner with Softmotion to transform your vision into a kinetic reality. Trusted by global galleries and Fortune-500 corporations, we provide the technical discipline needed to turn static environments into living experiences. Your creative potential is limitless when backed by seasoned expertise.
Frequently Asked Questions
What is the best file format for lenticular images?
Layered Photoshop (.psd) files are the industry standard for their flexibility in managing complex depth layers and masks. When you’re determining how to prepare artwork for lenticular printing, using a PSD allows for non-destructive adjustments during the interlacing phase. For exceptionally large files exceeding 2GB, a layered TIFF is a reliable alternative. Both formats preserve the high-fidelity detail required for fine art displays while ensuring the technical team can access individual visual components.
How many frames should I include in a lenticular flip effect?
A traditional flip effect typically utilizes two or three high-contrast frames to ensure a clean and punchy transition. While it’s possible to include more frames for a multi-frame animation, increasing the count often leads to a loss of sharpness or “pitch jump.” For architectural installations, keeping the narrative concise prevents visual clutter. Two frames offer the most dramatic transformation, while three can provide a subtle, intermediate step that feels more organic to the viewer.
Can I use high-resolution photographs for large-scale lenticular walls?
High-resolution photographs are excellent for large-format projects, provided they meet the minimum requirement of 200 DPI at the final print size. For installations larger than 36 inches, maintaining this density is crucial for clarity. You’ll also need to account for a 1/4 inch bleed on all sides to facilitate precision mounting. Photographs with well-defined edges and deep tonal ranges perform best, as they provide the structural clarity needed for the lens to function effectively.
What is the difference between LPI and DPI in lenticular printing?
LPI (Lenses Per Inch) refers to the physical frequency of the lenticular sheet, while DPI (Dots Per Inch) describes the printer’s output resolution. The relationship between the two is a mathematical necessity; your printer’s DPI must be a multiple of the lens LPI to ensure perfect alignment. In 2026, high-precision projects often utilize a 40 LPI or 60 LPI lens for large-format work, requiring a printer capable of delivering significantly higher resolution to maintain optical integrity.
How do I prevent ghosting in my lenticular artwork?
Preventing ghosting requires a strategic combination of high-contrast imagery and dark color palettes. Avoid placing a dark subject against a pure white background, as the white light will inevitably bleed into the adjacent frames. Instead, utilize textured backgrounds or “noise” to mask the subtle overlap between image slices. Ensuring that the primary subject remains in the exact same spatial position across all frames, known as the Center Point rule, also anchors the viewer’s eye.
Is specialized software required to prepare lenticular artwork?
Professional-grade software is essential for the complex interlacing math required for architectural and fine art projects. As of April 2026, Triaxes 3DMasterKit and Legend version 10.5 are the current benchmarks for high-precision file preparation. These tools allow designers to map depth and simulate the kinetic effect before fabrication. While basic effects can be generated with simpler tools, large-scale installations require this advanced optical precision to ensure a seamless and professional final result.
What is the maximum size for a single lenticular print installation?
While individual lenticular sheets have physical size limits, there is no technical maximum for an installation when using a multi-panel approach. Architectural projects frequently cover entire building facades or expansive lobbies by aligning multiple panels into a single, cohesive mural. Each panel is meticulously fabricated to ensure the kinetic effect remains continuous across the seams. This modular strategy allows for unlimited scale while maintaining the high resolution and optical clarity expected in premium environments.
How does viewing distance affect the choice of lenticular lens?
Viewing distance dictates the physical LPI and the viewing angle of the lens. A narrow viewing angle is ideal for close-range viewing, as it creates a fast and responsive transition. Conversely, installations viewed from a distance, such as tradeshow graphics or building facades, require a wider viewing angle to allow the effect to unfold gradually. Selecting the correct lens ensures the artwork remains legible and impactful relative to the viewer’s natural movement through the space.