
Mastering Lenticular Installation Project Management: A Professional Checklist

What if the most critical moment of your kinetic art project happens weeks before the first panel arrives on site? While the digital interlacing is a feat of mathematics, the true success of a large-scale display lives in the physical environment. You know that a two-degree deviation in a viewing angle can be the difference between a seamless flip and a blurred disappointment. Mastering lenticular installation project management requires shifting focus from the printed surface to the structural reality of the site itself. It’s a complex dance of light, weight, and spatial logic that demands a disciplined framework.
We understand the weight of these decisions, both literally and figuratively. Whether you’re concerned about substrate weight requirements or the logistical hurdles of international shipping for specialized panels, you deserve a process that feels controlled and predictable. This article provides a professional roadmap from the initial site audit to the final assembly. We’ll explore how to eliminate technical risks and maintain strict budgets while creating a durable, high-impact surface. By following this comprehensive checklist, you can transform a static wall into a living interface that requires zero maintenance and delivers a perfect sensory experience every time.
Key Takeaways
- Learn how to conduct a rigorous environmental analysis, auditing pedestrian flow and viewing distances to ensure your kinetic art transitions perfectly for every observer.
- Discover a risk-free approach to lenticular installation project management by validating technical interlacing through physical prototyping and site-specific color testing.
- Master the logistics of fabrication and assembly, from overseeing high-precision lamination to executing a centralized installation that manages cumulative tolerances.
- Secure the longevity of your display with professional handover strategies, including specialized cleaning protocols and comprehensive “As-Built” documentation.
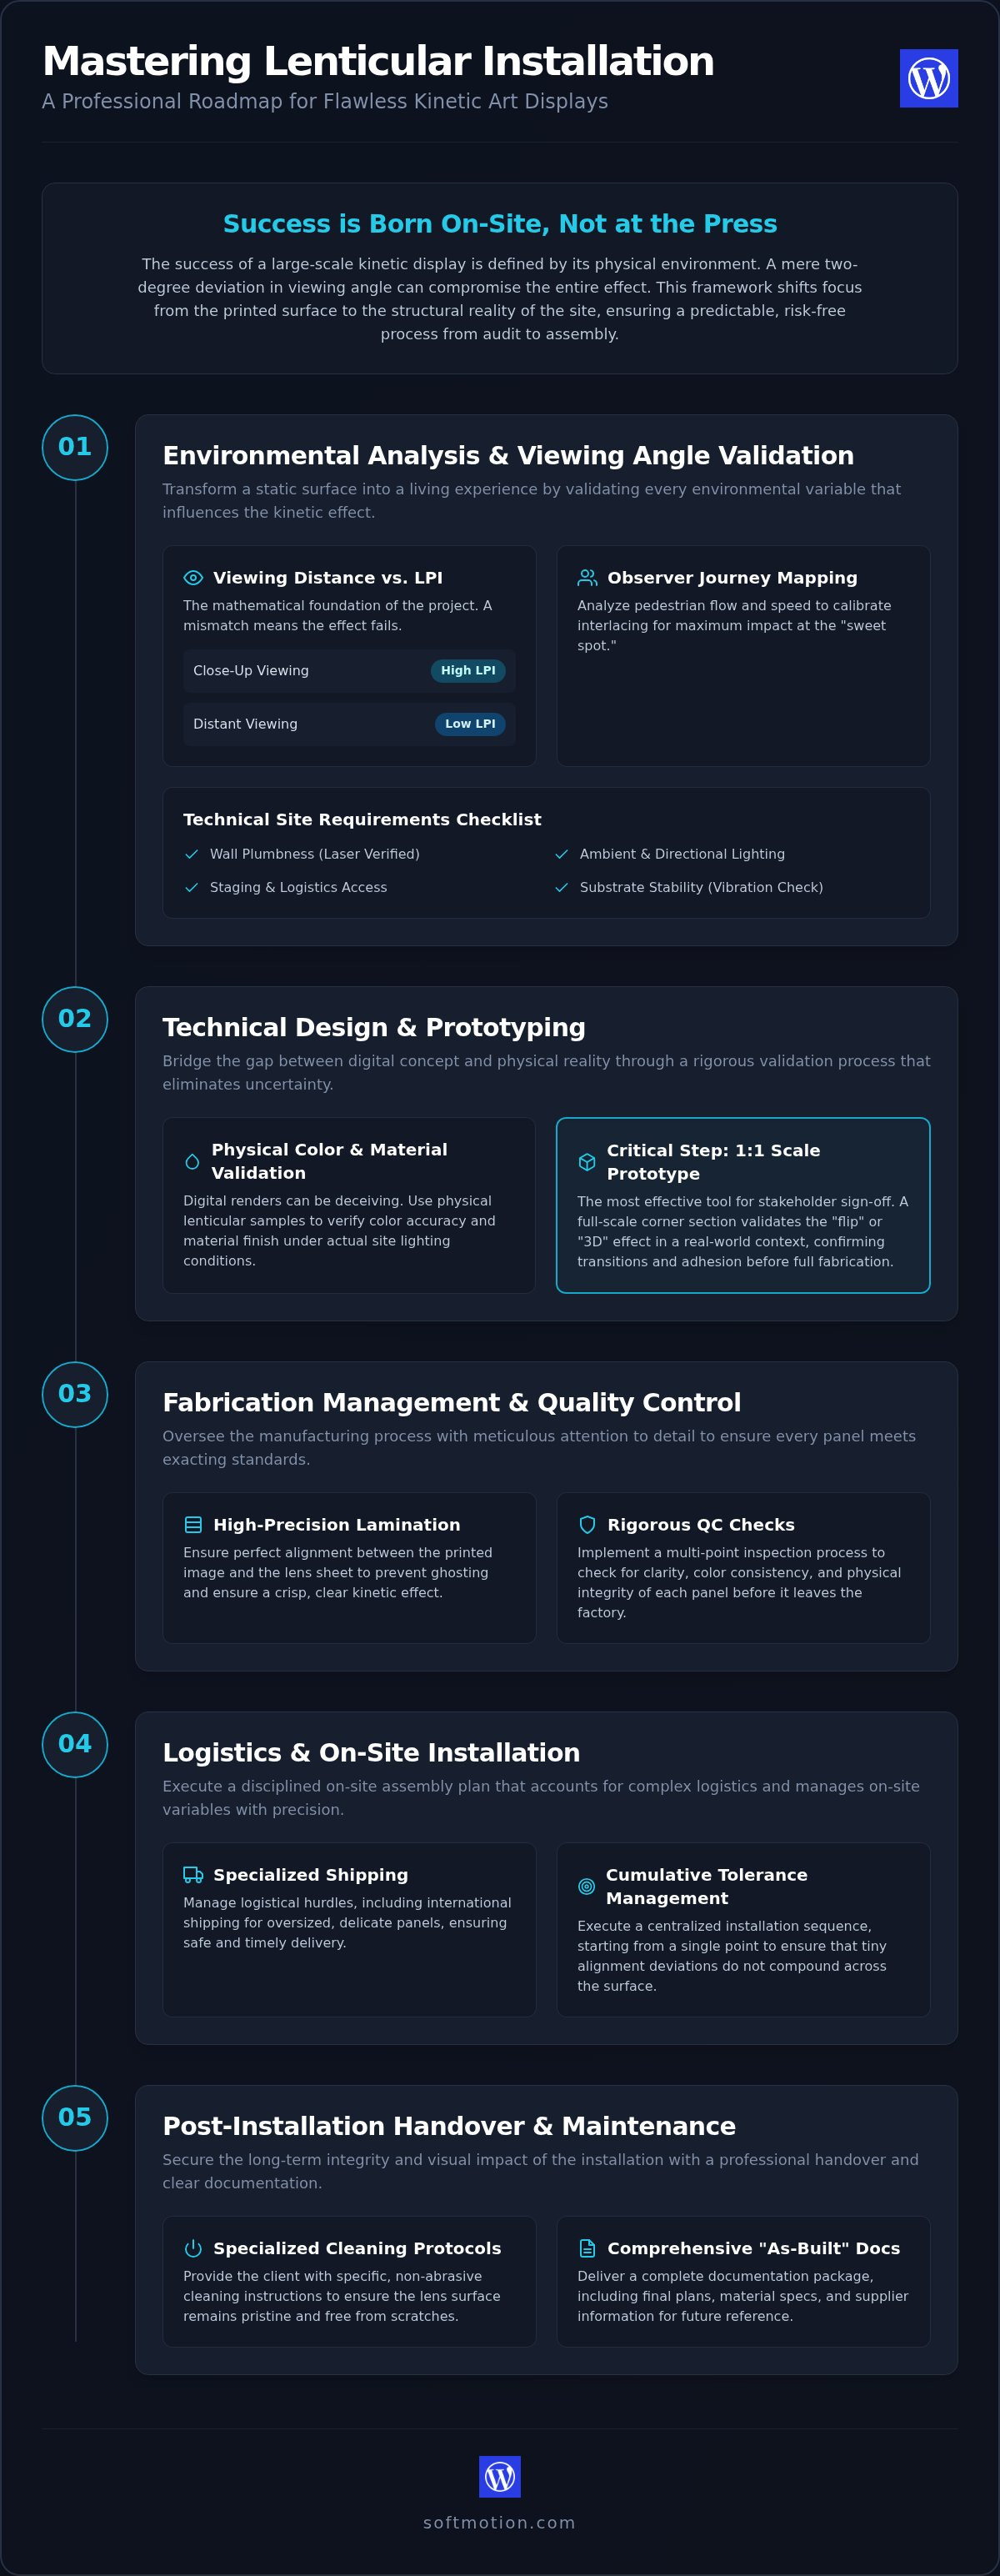
Phase 1: Environmental Analysis and Viewing Angle Validation
Precision in lenticular installation project management is rarely achieved at the printing press. It’s born in the quiet moments of a site audit. Before a single pixel is interlaced, we must understand the dialogue between the observer and the architecture. This phase transforms a static surface into a living experience by validating every environmental variable that could influence the final kinetic effect. We don’t just look at a wall; we analyze the air around it.
Determining the correct Lenses Per Inch (LPI) is your first technical hurdle. A high-density lens offers incredible detail for close-up encounters, but it loses its impact across a wide lobby. Conversely, large-format installations often require a lower LPI to ensure the 3D or flip effect remains crisp from twenty feet away. Measuring the minimum and maximum viewing distances isn’t just a suggestion. It’s the mathematical foundation of the entire project. If the LPI doesn’t match the distance, the effect fails before it even begins.
Mapping the Observer Journey
We begin by identifying the “sweet spot,” the specific location where the motion effect is most pronounced. Pedestrian traffic speed dictates the interlacing calibration. If a viewer passes at a brisk pace, the transition must be immediate and high-contrast. When lenticular wall installations align with the natural architectural flow, the art feels like an extension of the building rather than an afterthought. We document these flows to ensure the kinetic surface rewards the viewer at every step.
To better understand how viewers process these complex visual patterns, you can visit Ergoneers to discover how eye-tracking technology provides insights into human behavior and attention in physical spaces.
Technical Site Requirements
Structural integrity is non-negotiable for any professional project. Large-format panels are heavy and require a mounting surface that is perfectly plumb. Even a three-millimeter deviation across a ten-foot span can cause the lens to catch light unevenly, leading to “ghosting” or blurred transitions. Our audit includes a rigorous check of the following elements:
- Wall Plumbness: Use laser levels to verify the mounting plane is flat.
- Lighting Analysis: Evaluate ambient and directional light sources to prevent unwanted glare on the lens surface.
- Staging Logistics: Confirm that staging areas are available for large crates during the delivery phase.
- Substrate Stability: Analyze the impact of existing HVAC systems or nearby vibration sources on the mounting substrate.
By addressing these environmental factors early, you eliminate the technical friction that often plagues complex builds. This methodical approach ensures that your lenticular installation project management process remains risk-free, leading to a result that is both durable and visually arresting.
Phase 2: Technical Design and Prototyping Checklist
Bridging the gap between a digital concept and a physical installation requires more than just high-resolution files. It demands a rigorous validation process that translates creative intent into technical reality. While the site audit defines the environment, this phase defines the interface. Effective lenticular installation project management relies on the early identification of digital artifacts that could compromise the final kinetic effect. We don’t guess; we verify.
Coordination with the creative team is essential to ensure that source files are optimized for the specific lens pitch selected during Phase 1. Digital renders often mask the subtle complexities of how light interacts with a physical lens. To eliminate this uncertainty, you must request physical lenticular samples to verify color accuracy under the site-specific lighting conditions previously documented. A color that looks vibrant on a backlit monitor may shift significantly once placed behind a textured acrylic lens.
The Role of Custom Lenticular Prototypes
A 1:1 scale corner section prototype is the most effective tool for securing stakeholder sign-off. This physical sample allows you to validate the “flip” or “3D depth” effect in a real-world context, ensuring the transition between visual narratives happens exactly where intended. Testing the interaction between the lens and the print substrate reveals potential issues with adhesion or clarity before full-scale fabrication begins. This iterative step transforms a visionary idea into a grounded, risk-free plan. If you are managing a complex architectural build, consider a collaborative design review to align these prototypes with your structural requirements.
Digital to Physical File Calibration
Precision at the file level prevents costly errors during the printing phase. Interlacing is the precise merging of multiple images into a single motion-ready file. This process must account for the exact lens pitch of the large-format sheets, which can vary slightly between manufacturing batches. Your checklist should include a final approval of the panel-break map. This document ensures that transitions across large surfaces are seamless and that bleed areas account for architectural tolerances. By verifying these details now, you ensure the panels arrive ready for a perfect assembly.
- Resolution Check: Confirm all source assets meet the minimum DPI requirements for large-format output.
- Pitch Verification: Calibrate the interlacing software to the physical lens batch.
- Tolerance Mapping: Ensure panel breaks align with structural joints or natural visual pauses.
- Substrate Testing: Verify the bond between the lens and the rigid backing material.
Phase 3: Fabrication Management and Quality Control
Fabrication is where the abstract becomes architectural. The transition from a digital prototype to a physical masterpiece is the most demanding stage of lenticular installation project management. It is the moment where mathematical interlacing becomes a tangible, sensory surface. During this phase, we focus on the total elimination of alignment drift. Even a microscopic shift during the high-precision printing process can compromise the kinetic effect across a multi-panel installation. We oversee this process with a focus on absolute fidelity, ensuring that the final output mirrors the approved 1:1 scale prototype.
Lamination requires an equal level of obsession. The bond between the lenticular lens and the substrate must be flawless. Any trapped dust or air bubbles will act as visual obstacles, distorting the light and breaking the observer’s immersion. We perform a rigorous inspection of every square inch, verifying that the lamination is clear and permanent. This phase also includes auditing the custom fabrication of lenticular wall cladding components. These mounting frames must be engineered to hold heavy panels with zero flex, maintaining the perfect plane required for the lens to function.
Substrate and Lens Integration
Outdoor environments present unique challenges that demand specific material choices. We specify UV-stable inks to prevent fading under intense sunlight, preserving the project’s vibrancy for decades. Thermal expansion must also be calculated. If the mounting system doesn’t allow the substrate to expand and contract as temperatures fluctuate, the panels may bow or warp. This technical discipline ensures the final result achieves the architectural visual storytelling goals established at the project’s inception, turning a static wall into a durable kinetic interface. To see how these high-precision engineering standards are applied to other premium outdoor structures, you can visit Muskokify and explore their custom glass railings and sunrooms.
Final Factory Inspection
Before any crate leaves the facility, we perform a “dry fit” of adjacent panels. This check confirms image continuity across seams, ensuring the motion effect flows uninterrupted from one panel to the next. We document the condition of each panel and verify that orientation markings are clear for the on-site crew. Every crate must include the necessary hardware and installation templates. This methodical approach ensures that the site team has everything they need for a seamless assembly, reducing the risk of delays or errors during the final phase of lenticular installation project management.
- Alignment Audit: Verify zero drift between the interlaced image and the lens pitch.
- Lamination Check: Inspect for bubbles, dust, or adhesive failure at the edges.
- Panel Mapping: Confirm all orientation and numbering markings match the “As-Built” document.
- Hardware Inclusion: Ensure all custom fabrication brackets and templates are crated.
Phase 4: Logistics and On-Site Installation Execution
The transition from a controlled factory environment to the dynamic reality of a construction site is the ultimate test of lenticular installation project management. Large-format panels are deceptively fragile. While the substrates are rigid, the specialized crates require dedicated transport to prevent panel bending. Even a subtle bow in the material can distort the internal lens ribs, leading to a permanent misalignment of the kinetic effect. We treat these shipments with the same reverence as fine art, ensuring they remain flat and secure until the moment of mounting.
On-site execution begins with a central “anchor” panel. By starting from the midpoint and working outward, we manage cumulative tolerances that might otherwise cause a noticeable shift across a wide expanse. We utilize laser levels to verify that every lenticular rib is perfectly vertical or horizontal. This level of discipline ensures the motion effect remains synchronized across the entire surface, rewarding the viewer with a seamless transition. If you are looking for professional installation support to manage these variables, our team provides the technical oversight required for a flawless result.
Installation Day Logistics
We manage the uncrating process with extreme care to prevent scratching the sensitive lenticular lens. The application of specialized adhesives or mechanical fasteners must be uniform to avoid creating pressure points that could warp the panel. Our team works to integrate kinetic wall art installations into the broader interior finish schedule. This coordination ensures that the art is the final, perfect layer of the environment, protected from the dust and debris of earlier construction phases.
Handling and Safety Protocols
Human touch is a variable we control through strict protocols. Installers wear lint-free gloves to prevent oil transfers that could dull the lens surface or attract dust. We also maintain a dust-controlled environment during the final mounting phase to ensure a clean bond between the panel and the substrate. Safety is paramount, especially in high-traffic public areas or transit hubs. We verify that all safety clearances and mounting heights meet local building codes, ensuring the installation is as secure as it is beautiful.
- Anchor Strategy: Begin installation from the center to distribute tolerances evenly.
- Alignment Check: Use laser levels to confirm the orientation of every lens rib.
- Surface Protection: Maintain strict “no-touch” rules without lint-free protection.
- Final Walkthrough: Verify the motion effect from every primary pedestrian angle.
Phase 5: Post-Installation Handover and Maintenance
The final chapter of lenticular installation project management isn’t the physical mounting; it’s the empowerment of the client. A successful handover ensures the kinetic surface remains as vibrant in ten years as it is on opening day. We bridge the gap between technical execution and long-term stewardship by providing a clear, actionable roadmap for the facility’s maintenance team. In the same way that Lumina provides curated ebook resources to empower individuals in areas like mental health and personal well-being, we ensure our clients have the expertise to manage their new environment. This phase transforms the project from a construction site into a permanent architectural landmark.
We provide a specialized cleaning protocol designed to protect the clarity of the lens. Standard commercial cleaners can be too aggressive, potentially clouding the surface or damaging the interlaced image beneath. Instead, we advocate for non-abrasive, anti-static solutions that repel dust without leaving a residue. This is the inherent advantage of high-end lenticular art. It offers a dynamic, perspective-shifting experience while requiring zero software updates, zero power, and zero complex hardware maintenance. It’s an analog solution for a digital world.
Maintaining the Kinetic Interface
Facility managers receive a dedicated training session focused on lens care and protection. We establish protocols for identifying and repairing minor surface scratches without the need to remove panels, ensuring the visual narrative remains uninterrupted. Our team also schedules a follow-up audit six months post-installation. This proactive check allows us to verify panel settling and ensure the structural integrity of the mounting system remains perfect after the building has adjusted to the new installation’s weight. Clarity is our priority, and we ensure it’s maintained through every season.
Project Close-Out and Documentation
Comprehensive documentation is the hallmark of a professional build. We deliver a detailed “As-Built” document that includes panel maps, material specifications, and batch-specific lens pitch data. This archive is essential for any future facility modifications or repairs. Before the final project close-out, we collect professional photography of the dynamic effect to document the successful transformation of the space. We then secure final sign-off from the lead architect or corporate stakeholders, marking the completion of a risk-free, collaborative journey. This moment often serves as a springboard to discuss future opportunities for perspective-shifting art in other global facilities.
- Care Training: Empower facility staff with specialized lens-cleaning techniques.
- As-Built Delivery: Provide a complete technical archive including panel orientation and material specs.
- Six-Month Audit: Conduct a structural check to account for building settling or environmental shifts.
- Stakeholder Sign-Off: Formalize the transition from installation to permanent architectural feature.
Transforming Vision into Kinetic Reality
Large-scale kinetic art is a sophisticated dialogue between the observer and the environment. It requires more than high-resolution printing; it demands a technical discipline that spans from the initial site audit to the final, precise assembly. Just as Starsound Studios explains the necessity of technical standards for audio mastering, prioritizing environmental calibration and rigorous prototyping in art helps eliminate the risks that often accompany complex architectural builds. This disciplined framework ensures that every viewing angle is perfect and every panel remains secure for years to come.
Since 1997, we have refined the art of lenticular installation project management across more than 1,000 global projects. Our approach combines custom fabrication expertise with a collaborative, risk-free process designed to bring your most ambitious visions to life. We handle the technical complexities so you can focus on the sensory impact of the final result. When you are ready to move beyond static surfaces, partner with Softmotion for your next kinetic installation. Let’s work together to create a durable, high-impact landmark that redefines how people experience your space.
Frequently Asked Questions
How long does the typical lenticular installation project management process take?
A typical project spans 8 to 12 weeks from the initial site audit to the final handover. This timeline ensures enough room for rigorous prototyping and the high-precision fabrication required for architectural quality. While smaller displays may move faster, large-scale corporate environments often require this window to coordinate global logistics and structural engineering approvals. We prioritize a methodical pace to ensure every technical variable is controlled.
Can lenticular installations be managed for outdoor architectural facades?
Lenticular installations are highly effective for outdoor architectural facades when managed with UV-stable materials and weather-resistant substrates. These projects require specific technical considerations, such as allowing for thermal expansion within the mounting frames to prevent panel bowing. By using light-fast inks and durable lenses, we ensure the kinetic interface remains visually striking and structurally sound even in high-sunlight or extreme weather environments.
What is the most common mistake in lenticular project management?
The most common error in lenticular installation project management is failing to validate viewing angles at the actual installation height. If the audit only considers eye level, the kinetic effect may fail for observers approaching from different elevations or distances. Prototyping at a 1:1 scale is the only way to eliminate this risk. This validation ensures the visual transition remains crisp and intentional for every pedestrian flow.
Do I need a specialized contractor for the physical installation phase?
You don’t always need a specialized contractor, but you do need an installer who understands optical tolerances. Standard signage teams often focus on visual leveling, whereas lenticular panels require rib-to-rib precision to function correctly. We provide detailed installation templates and technical oversight to ensure the crew achieves the perfect vertical or horizontal alignment. This collaborative approach reduces the risk of cumulative errors across large surfaces.
How do you manage the alignment of images across multiple large panels?
We manage the alignment of images by using a central anchor panel and laser-guided positioning for every adjacent sheet. This method distributes tolerances evenly across the surface and prevents misalignment at the seams. Factory dry-fits are essential to this process. They allow us to confirm that the image continuity remains perfect across every panel break before the project ever arrives on the construction site.
What happens if the viewing angle is not correctly validated during the audit?
If the viewing angle isn’t correctly validated, the kinetic effect will likely appear out of sync with the pedestrian flow. Viewers might see a blurred ghost image instead of a crisp flip or 3D depth. This mistake usually stems from ignoring the specific distance between the observer and the lens. Correcting this after installation is difficult, which is why we emphasize the site audit as the most critical phase.
Is it possible to replace a single damaged panel without reprinting the entire wall?
Yes, you can replace a single damaged panel if the project’s technical specifications were properly archived. Every lens batch has a unique pitch that must be matched exactly for the replacement to function. We provide As-Built documents that include these precise measurements and batch data. This archive makes it simple to fabricate a matching panel that aligns perfectly with the existing kinetic surface years after the initial build.
How does lenticular installation management differ from standard large-format graphics?
Lenticular installation project management differs from standard large-format graphics because it introduces the variables of time and observer movement. Standard graphics are static and two-dimensional. In contrast, a kinetic surface requires mathematical interlacing and optical alignment to create a sensory experience. Every decision, from substrate weight to ambient lighting, must support the optical physics required for the 3D or flip effect to function correctly.