
3D depth lenticular graphics: How depth and motion work

A flat print can seem to shift, move or open into depth as you change your viewpoint. 3D depth lenticular graphics create that illusion by combining image views beneath a precisely aligned lens sheet, which directs different parts of the image to each eye or viewing angle.
That shift in perspective can make you wonder, “Did that graphic just change?” The effect is optical, not electronic: the print can create depth and motion without special glasses or an electrical system.
Here, you’ll learn how lenticular images are assembled, how stereobase and convergence shape perceived depth, and how the lenses guide what you see. The key is the relationship between the captured views, their alignment beneath the lenses, and the distance from which you view the finished graphic.
Key Takeaways
- Learn which design, prepress, printing and cutting issues can disrupt a clean lenticular effect, and why precise alignment matters.
- See how professionals select and assemble image frames, balancing a smooth sequence with controlled parallax.
- Understand how stereobase and convergence guide depth, including different camera-spacing starting points for people and smaller objects.
- Discover why perceived depth shifts with viewing distance and how lens design shapes the graphic’s visual impact.
What Are Lenticular Prints?
3D depth lenticular graphics place a segmented image beneath a sheet of narrow lenses. Each lens directs different image strips toward an eye or viewing angle, producing depth or motion from a flat surface.
Creating 3D and Motion Effects
A lenticular print creates a 3D effect by directing slightly different views to the viewer’s left and right eyes; motion appears as the viewing angle changes. The brain combines those views through binocular disparity, the difference between what each eye sees. This matters because image separation and lens alignment determine whether forms appear dimensional rather than doubled or blurred.
Animated and Transforming Prints
Animated prints use interlaced frames to show a sequence, while transforming prints shift between distinct images. A flip can display up to 15 images depending on viewing angle; fuller motion can use up to 60 video frames. The intended result guides frame selection: a subtle transition, a clear before-and-after, or more continuous movement across the surface.
Binocular Disparity and Depth
Binocular disparity is the small difference between left-eye and right-eye views that lets the brain infer depth. In lenticular printing, image views are divided into narrow strips beneath lens elements, so each eye receives a different perspective. This creates depth without special glasses or electronics, while the intended viewing distance shapes how the effect reads.
Printing and Mounting Graphics
Production interlaces the image views, prints the composite, then precisely aligns the lens sheet. Misregistration can cause ghosting or soft edges; poor segmentation can disrupt transitions, while scratches, bubbles, or uneven cuts distract from the effect. Mounting and trimming must preserve alignment. Durability depends on the material, mounting, handling, and display conditions. Clean gently with a soft, dry cloth, avoid abrasive cleaners, and store flat with the printed face protected from pressure and dust.
Printing and assembling lenticular images
Professional lenticular printing turns a planned image sequence into a composite file, then aligns it with a lens sheet. Camera movement, frame order, cropping, and registration all shape the finished effect.
Professional planning for camera movement and image order
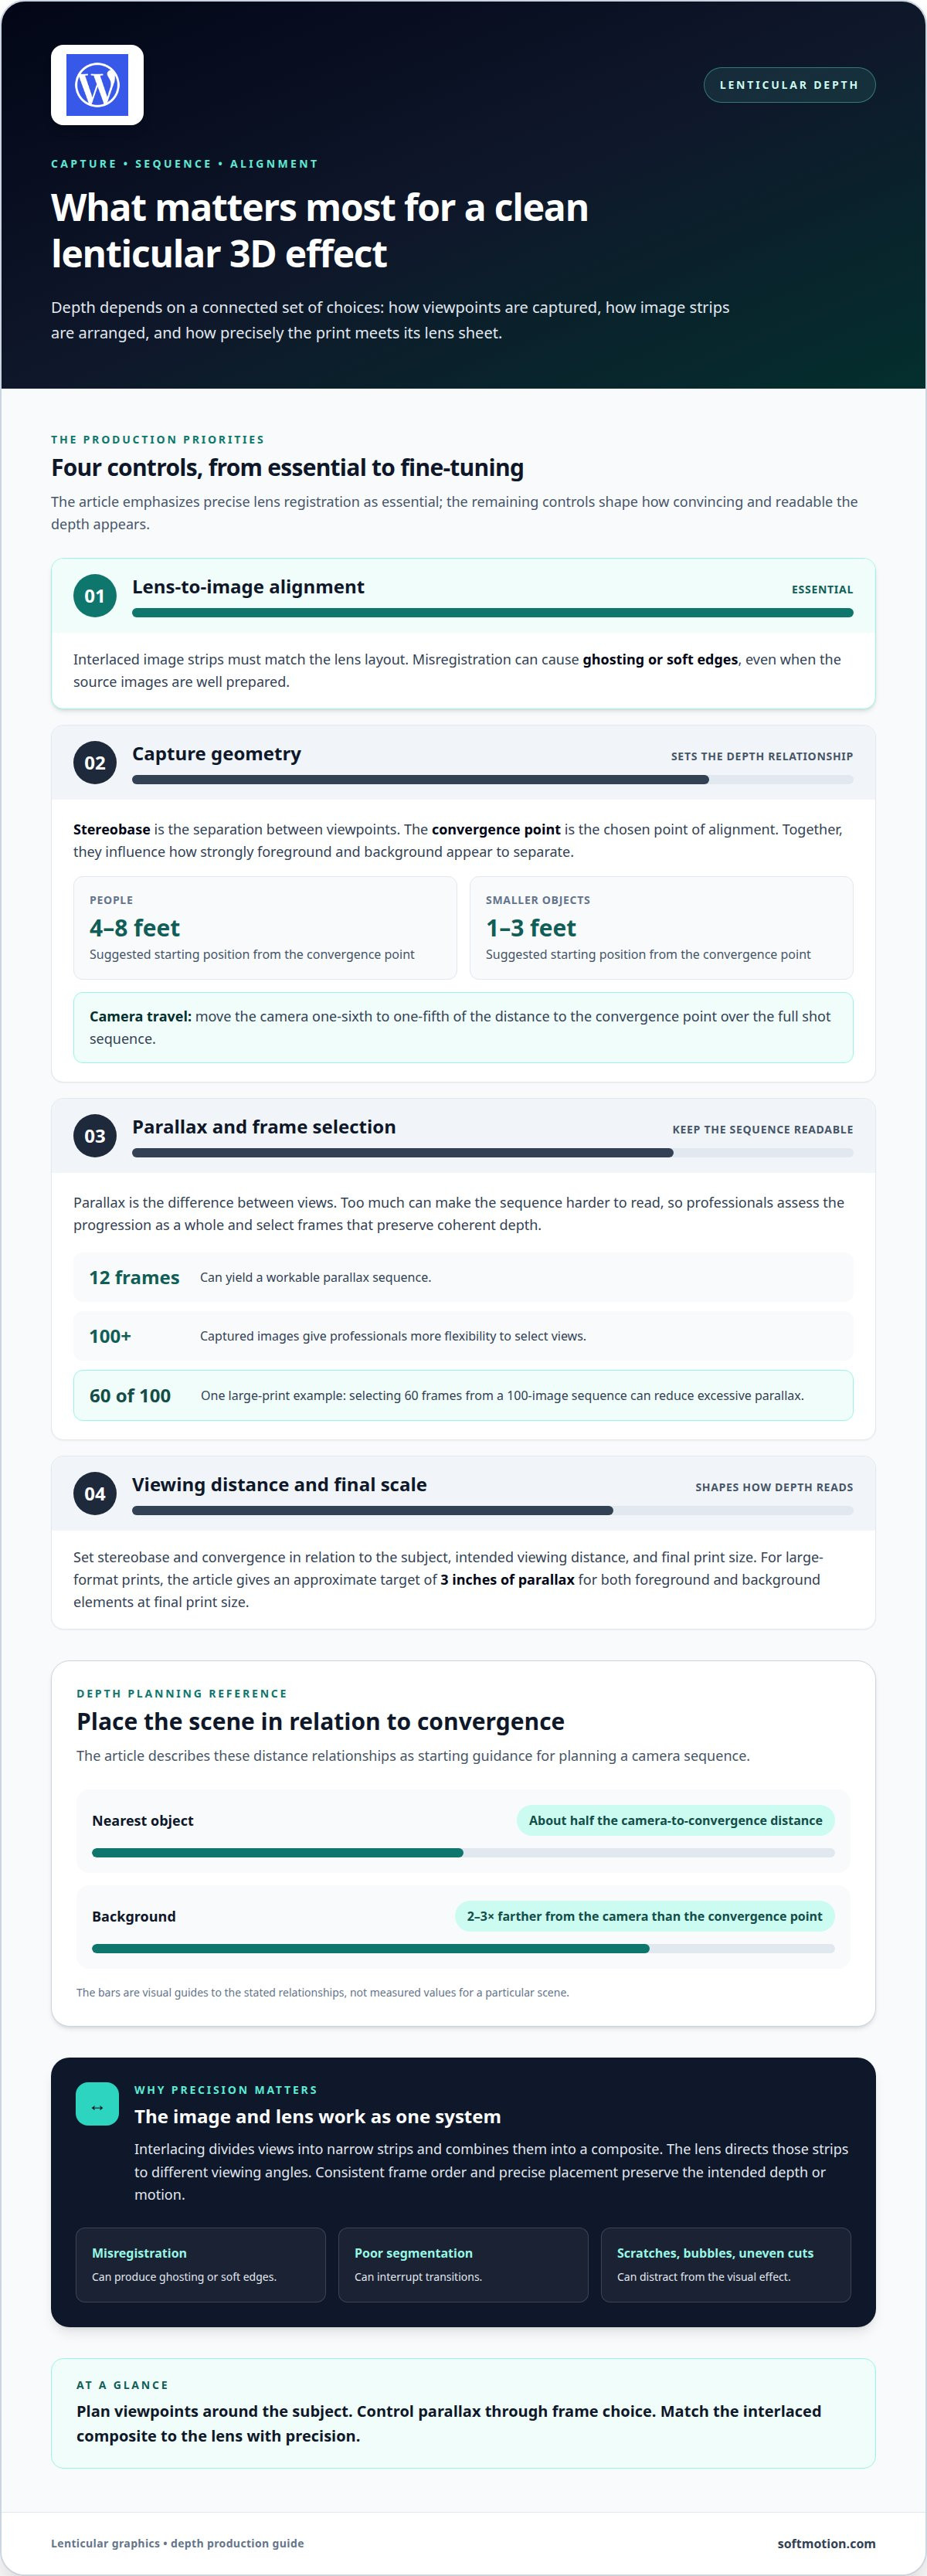
Camera movement establishes how the subject changes across the sequence, so professionals plan its path before preparing the images. For a lenticular camera sequence, a starting rule is to move the camera one-sixth to one-fifth of the distance to the convergence point over the full shot sequence.
Frame order must follow that movement consistently. Twelve frames can yield a workable parallax sequence, while capturing 100 images or more gives professionals greater flexibility to select views. For a large print, a smaller selection, such as 60 frames from a 100-image sequence, can reduce excessive parallax.
Professional interlacing for lenticular images
Interlacing divides each image into narrow strips and combines them into one composite, arranging the views for the lens sheet. The lens then directs the image strips toward the appropriate viewing angles. This step matters because an incorrect sequence order or inconsistent strip placement can interrupt motion and weaken depth.
Before printing, professionals match the interlaced file to the lens layout. They preserve the intended image order and check that the composite fits the print area. Precise alignment between the segmented images and the lens is essential for the graphic to work properly.
Stereoscopy in Interlaced Images
Stereoscopy uses different views of a scene to create depth, and interlacing arranges those views for lenticular lenses. In a depth sequence, the left and right eyes receive slightly different perspectives, which the brain combines. The relationship between the views matters: excessive parallax can make the sequence harder to read.
Professionals assess the image sequence as a whole, not as isolated frames. When a large print uses 100 captured images, selecting 60 frames is one example of reducing parallax while retaining a coherent progression.
How professionals separate artwork and images to create depth
Artwork preparation separates the intended views, then crops and aligns them into a consistent image sequence before export. Professionals keep the subject positioned across frames, manage edges that could be cut off, and prepare the composite to match the lens layout. These decisions help preserve depth across the printed area.
During assembly, the printed composite and lens sheet must meet in precise alignment. A shift between segmented images and lenses can disrupt the effect, even when the source images are well prepared. For a physical reference during project planning, explore lenticular samples.
How professionals choose stereobase and convergence point
Stereobase is the separation between viewpoints used to capture a scene; the convergence point is the chosen point of alignment. Together, they determine how strongly foreground and background elements appear to separate. Professionals set both in relation to the subject, intended viewing distance, and final print size, rather than treating camera movement as an isolated choice.
For lenticular photography of people, a useful starting position is 4-8 feet from the convergence point. For smaller objects, the suggested distance is 1-3 feet. These different starting points reflect the scene’s scale: a portrait and a compact object occupy different proportions of the camera’s view.
Professionals also plan the sequence’s total camera movement. A starting rule is to move the camera one-sixth to one-fifth of the distance to the convergence point over the full shot sequence. The nearest object should sit about half that camera-to-convergence distance away, while the background should be two to three times farther from the camera than the convergence point.
For large-format prints, the recommended target is approximately 3 inches of parallax for both foreground and background elements at final print size. Parallax describes the apparent shift between views, so the target gives professionals a way to balance dimensional impact with a coherent image. They assess the assembled scene at its intended scale, not only in the original photographs.
These measures work together. If camera movement is too broad for the scene, foreground and background views can diverge excessively; too little movement may make their separation less evident. Professionals use the convergence point as a planning anchor, then set the stereobase and sequence around the subject’s depth. A portrait, for example, calls for different camera placement than a small object, while a large-format print makes final-size parallax an important design check.
How lenticular lenses create depth and motion illusions
A lenticular lens sheet separates interlaced image strips, directing different views to each eye or viewing angle. The brain reads those differences as depth; as the viewer moves, the lenses reveal changing strips, creating motion or transformation. The illusion depends on coordinated image spacing, lens pitch, and viewing position, not on an electronic display.
Professionals select lens pitch and viewing angle in relation to the planned distance between the graphic and its audience. That distance guides how software translates the images and helps determine suitable lens material. A display designed for nearby viewers needs different image-to-lens coordination than one intended to be viewed from farther away. The intended angle matters too, because it governs when each strip becomes visible.
Viewing distance changes perceived depth. For an object appearing in front of the sheet, depth follows the relationship y = EG/(AC + EG) × x. For an object appearing behind it, the relationship is y = EG/(AC − EG) × x. Here, x represents viewing distance and y perceived depth; the formulas show how each changes with distance.
The difference between the formulas has a practical consequence: perceived depth behind the sheet is more sensitive to changes in viewing distance than depth in front. As a viewer moves farther away, perceived 3D depth increases; at a shorter distance, it appears shallower. Professionals account for this when shaping foreground and background placement, so the illusion suits the display’s viewing conditions.
For a project where viewing distance and angle shape the experience, plan a lenticular graphics project around its intended audience and setting.
Softmotion: Tradeshow Lenticular Graphics
Softmotion creates Tradeshow Lenticular Graphics for organizations that want booth visuals to reveal depth, motion, or changing imagery as visitors move. This format can transform a fixed display into a more engaging visual focal point, while the image sequence and viewing conditions shape the effect.
For projects beyond the tradeshow floor, Softmotion also produces Advertising Lenticular Displays, Architectural Lenticular Installations, and Fine Art Lenticular Prints. The right application depends on the setting, audience, and visual purpose: a branded display, a spatial feature, or an artwork each calls for its own creative approach.
If you’re planning a lenticular graphic for an upcoming project, contact Softmotion to discuss your concept and intended setting.
Shape the next visual experience
The next step is to define what you want the audience to notice, feel, or remember. A 3D depth lenticular graphics project takes shape around that intention, then connects the visual concept to its real setting and audience.
Softmotion offers Advertising Lenticular Displays, Architectural Lenticular Installations, Fine Art Lenticular Prints, and Tradeshow Lenticular Graphics. Each offers a different context for turning an image into a dimensional visual experience. Start with a clear idea of where the graphic will appear and the role it should play there.
Bring that direction into a conversation, whether you’re developing a display, installation, or artwork. Contact Softmotion to discuss your project and explore how the concept could take form.
A thoughtful brief can set the stage for a distinctive visual experience.
Frequently Asked Questions
Did That Graphic Just Change?
Yes, the image can appear to change as you move past it or shift your viewing angle. A display beside a walkway, for example, may reveal a different scene as someone passes from one side to the other. The print itself remains static; your viewing position changes which parts of the image reach your eyes.
Why use them?
Lenticular graphics make a fixed surface more visually engaging by adding dimensionality, movement, or a changing image. A brand might use a transformation to show a product before and after, while an artwork could use depth to create a stronger sense of space. The best effect depends on the message, audience, display location, and how viewers encounter it.
How do 3D depth lenticular graphics work?
They work by presenting different image information through a lens sheet, allowing each eye or viewing angle to receive a distinct view. The brain interprets those differences as depth, while a change in angle can reveal other parts of the image. Because the illusion is created by printed images and lenses, it doesn’t rely on an electronic display or special glasses.
What resolution and file specifications are needed for lenticular printing?
Resolution depends on the finished print dimensions and the detail the artwork needs to preserve. The production file must also suit the selected lens pitch and image sequence, since the composite is divided into strips for printing. Cropping, image proportions, and edge placement matter too. Professionals prepare the artwork around the intended scale and lens alignment rather than applying one universal file specification.
What is the difference between 3D depth, flip, and animation lenticular effects?
A depth effect makes elements appear at different distances within a scene. A flip switches between distinct images as the viewing angle changes, such as one design transforming into another. Animation presents a more continuous progression of image states, like a subject moving through an action. Choose the effect based on whether the message needs spatial dimension, a clear reveal, or visible movement.
What materials and printing methods are used for lenticular graphics?
A lenticular graphic pairs a printed, interlaced image with a sheet of lenses. The image is prepared so its separated views align with the lens structure, then printed and mounted together. Lens material is selected in relation to the intended viewing distance and display conditions. Alignment is central: even a well-designed image can lose clarity if the printed layers don’t register correctly.